

How to Install and Use Inflatable Bridge Void Formers Correctly
Inflatable bridge void formers are widely used to create hollow cavities inside precast and cast-in-place concrete structures such as bridge slabs, hollow-core beams, box girders, culverts, and other infrastructure components. Their ability to inflate before concrete placement and deflate after curing makes them a flexible and reusable alternative to many rigid internal molds.
However, the performance of inflatable bridge void formers depends heavily on correct installation and use.
If an inflatable bridge void former is positioned incorrectly, underinflated, poorly restrained, damaged by reinforcement, or exposed to excessive concrete pressure, the final cavity can deform, shift, float, or become difficult to demold.
Correct installation helps maintain cavity geometry, concrete cover, structural dimensions, and reusable service life.
This guide explains how to install and use inflatable bridge void formers correctly, including pre-installation inspection, positioning, inflation, pressure control, anchoring, concrete placement, vibration, deflation, removal, cleaning, maintenance, storage, and common installation mistakes.
Inflatable bridge void formers are flexible internal molds designed to create hollow sections inside concrete members.
They are commonly manufactured from reinforced rubber or rubber-fabric composite materials.
A typical inflatable bridge void former includes:
Inner airtight rubber layer
Reinforcement fabric
Outer protective rubber layer
Inflation valve
End sections for handling or pulling
Before concrete placement, the inflatable bridge void former is installed inside the reinforcement cage and inflated to the required working pressure.
The inflated mold maintains the required cavity shape while fresh concrete is poured around it.
After the concrete gains sufficient initial strength, the inflatable bridge void former is deflated and removed.
This leaves a hollow internal cavity inside the concrete structure.
Inflatable bridge void formers are commonly used in:
Hollow bridge slabs
Precast concrete beams
Box girders
Hollow-core bridge decks
Culverts
Tunnel components
Drainage structures
Municipal infrastructure
Special precast concrete elements
They are particularly useful where rigid internal molds are difficult to remove.
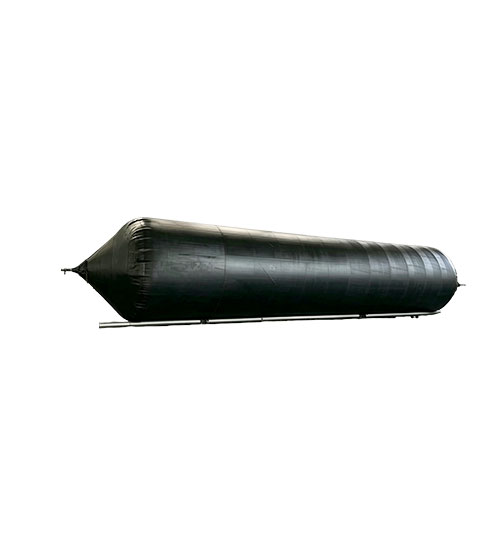
Correct inflatable bridge void former installation affects the final quality of the concrete member.
Poor installation can lead to:
Incorrect cavity position
Uneven concrete cover
Void former floating
Lateral movement
Shape deformation
Air leakage
Surface damage
Difficult removal
Reduced reuse life
A correctly installed inflatable bridge void former should maintain:
Required position
Required elevation
Correct cross-sectional shape
Stable working pressure
Adequate concrete cover
Reliable restraint
throughout the concrete pour.
Before installing inflatable bridge void formers, review the structural and construction drawings carefully.
Confirm:
Required cavity size
Cavity length
Cavity shape
Position
Concrete cover
Reinforcement layout
End opening
Extraction direction
Do not install the void former based only on approximate dimensions.
The position of the inflatable bridge void former must match the approved structural design.
Before every use, inspect the inflatable bridge void former carefully.
Check for:
Cuts
Punctures
Surface abrasion
Seam damage
Valve damage
Previous repair areas
Local deformation
Even small damage can cause air leakage during concrete placement.
If leakage occurs after the concrete pour begins, cavity shape may be affected.
Before installation, inflate the void former and check whether it maintains pressure.
A leakage test can identify:
Valve leakage
Surface punctures
Seam defects
Previous repair failure
The inflatable bridge void former should hold the required pressure without significant loss.
A leaking void former should be repaired before use.
The surface should be clean before installation.
Remove:
Concrete residue
Dirt
Oil
Dust
Sharp debris
A clean inflatable bridge void former is easier to inspect and less likely to be damaged during installation.
Before inserting the void former, inspect the reinforcement cage.
Look for:
Sharp steel ends
Welding projections
Binding wire
Rough edges
Narrow clearance points
Sharp reinforcement can puncture or cut the rubber surface.
Where necessary, protect sharp contact points before installing the inflatable bridge void former.
Inflatable bridge void formers should generally be inserted while deflated.
The deflated condition allows the former to pass through reinforcement cages and narrow openings more easily.
During insertion:
Avoid dragging the rubber across sharp steel.
Keep the valve protected.
Avoid twisting the former.
Support long formers at several points.
Long inflatable bridge void formers should be handled carefully to prevent abrasion.
Positioning is one of the most important installation steps.
Check:
Centerline
Elevation
Longitudinal position
End location
Concrete cover
Reinforcement clearance
The inflatable bridge void former should be located exactly where the cavity is required.
Incorrect position can reduce wall thickness or concrete cover.
Once the void former is positioned, begin inflation slowly.
Do not immediately apply maximum pressure.
Gradual inflation allows installers to monitor:
Shape
Straightness
Alignment
Contact with reinforcement
Position
As the inflatable bridge void former expands, its position may change slightly.
Recheck alignment during inflation.
Working pressure is critical to shape stability.
If the inflatable bridge void former is underinflated, it may:
Flatten
Sag
Bend
Distort under concrete pressure
If it is overinflated, the rubber and reinforcement layers may be unnecessarily stressed.
The correct working pressure depends on:
Diameter
Cross-sectional shape
Length
Rubber thickness
Reinforcement fabric
Concrete placement height
Fresh concrete pressure
Always use the working pressure specified for the actual void former.
One of the biggest challenges when using inflatable bridge void formers is buoyancy.
Because the former contains air, fresh concrete tends to push it upward.
If the void former floats, the cavity may move too close to the top surface.
This can cause:
Reduced concrete thickness
Uneven cover
Structural dimensional problems
To prevent floating, use suitable restraints such as:
Positioning bars
Tie-down systems
Reinforcement-based supports
Steel brackets
Cross restraints
The restraint system should hold the inflatable bridge void former firmly without damaging the rubber.
The void former can also shift sideways.
Lateral movement may occur due to:
Uneven concrete placement
Inadequate support
Excessive vibration
Poor alignment
Long inflatable bridge void formers should be restrained at multiple points.
The greater the length, the more important lateral control becomes.
Before concrete placement, confirm the distance between the inflatable bridge void former and:
External concrete surface
Reinforcement
Prestressing tendons
Adjacent void formers
Concrete cover must meet the structural design.
In hollow slabs using multiple inflatable bridge void formers, spacing between adjacent voids is especially important.
The valve should remain accessible during the concrete pour.
This allows pressure adjustment if necessary.
The valve should not be:
Buried in concrete
Crushed by reinforcement
Exposed to direct concrete impact
Proper valve positioning makes pressure monitoring easier.
Before concrete placement begins, complete a final inspection.
Confirm:
Correct pressure
Correct position
Correct elevation
Secure restraints
Adequate concrete cover
No visible damage
Valve accessibility
Do not begin concrete placement if the inflatable bridge void former is unstable.
Concrete placement has a major effect on inflatable bridge void former performance.
The concrete should be poured gradually and evenly.
Avoid placing a large amount of concrete on one side of the void former.
Uneven concrete pressure can cause lateral movement.
Balanced pouring helps maintain alignment.
Where possible, concrete should be placed alternately or symmetrically around the inflatable bridge void former.
This reduces uneven pressure.
Dropping concrete from excessive height can create concentrated impact.
This may cause:
Temporary deformation
Displacement
Surface abrasion
Concrete should be placed in a controlled manner.
Rapid pouring can increase local pressure.
The concrete placement rate should match:
Void former design
Formwork design
Restraint capacity
Construction procedure
For large box girders and deep sections, this becomes especially important.
Do not assume the void former will remain stable automatically.
During concrete placement, monitor:
Pressure
Position
Alignment
Elevation
Restraints
Surface condition
If the void former begins to move, the cause should be identified immediately.
Concrete vibration is necessary to remove air pockets and improve compaction.
However, vibrators should be used carefully around inflatable rubber molds.
Do not repeatedly strike the void former directly with a vibrator.
Direct contact can cause:
Abrasion
Puncture
Local deformation
Air leakage
Operators should maintain enough distance to protect the inflatable bridge void former while still achieving proper concrete consolidation.
Dense reinforcement and internal formwork can restrict concrete flow.
To reduce honeycombing:
Maintain adequate reinforcement clearance.
Use suitable concrete workability.
Place concrete in controlled layers.
Vibrate correctly.
Avoid blocked flow paths.
Good concrete consolidation is essential around the inflatable bridge void former.
Pressure should be checked during concrete placement.
Pressure may change because of:
Temperature
External concrete pressure
Leakage
Material deformation
If pressure drops significantly, the inflatable bridge void former may lose shape.
Pressure adjustments should be made according to the construction procedure.
Avoid excessive compensation by overinflating.
Air leakage is one of the most serious problems during use.
Common causes include:
Sharp reinforcement
Damaged valves
Punctures
Seam damage
Improper previous repairs
To reduce leakage risk:
Pressure-test before use.
Protect sharp steel.
Keep valves clean.
Avoid dragging the void former.
Inspect after each production cycle.
The void former should only be deflated after the concrete develops enough strength to maintain the internal cavity.
If deflated too early, the concrete may:
Sag
Deform
Crack
Lose cavity geometry
If deflated too late, removal may become more difficult.
The correct timing depends on:
Concrete mix
Cement type
Temperature
Curing conditions
Member dimensions
There is no single universal deflation time.
Follow the approved concrete construction procedure.
Deflation should be gradual.
Open the valve carefully and allow air to escape slowly.
Do not forcefully collapse the former.
Gradual deflation helps the rubber separate from the concrete cavity.
Before pulling the inflatable bridge void former out, confirm that it is sufficiently collapsed.
Once fully deflated, remove the void former carefully.
The removal direction should have been planned before concrete placement.
For long formers:
Pull steadily.
Avoid sudden jerking.
Keep the former aligned with the cavity.
Avoid dragging over sharp concrete edges.
Excessive pulling force can damage the rubber.
Difficult removal may result from:
Incomplete deflation
Concrete leakage
Insufficient release preparation
High surface friction
Long cavity length
Misalignment
If removal resistance is high, first confirm that the former is fully deflated.
Do not immediately use excessive pulling force.
Excessive force can tear the void former.
After removal, clean the inflatable bridge void former promptly.
Concrete residue becomes more difficult to remove after hardening.
Cleaning should not involve tools that can cut or puncture the rubber.
After cleaning:
Dry the surface.
Inspect the rubber.
Inspect seams.
Check valves.
Check repair areas.
If the inflatable bridge void former has experienced heavy use, it is useful to perform another air test.
This can identify damage before the next production cycle.
Testing after use is particularly important when:
The former contacted reinforcement.
The pour involved heavy vibration.
Removal was difficult.
Surface abrasion is visible.
Regular maintenance improves reusable service life.
Important maintenance steps include:
Inspect before each use.
Inspect after each use.
Repair small damage promptly.
Keep valves clean.
Avoid overinflation.
Remove concrete residue.
Store correctly.
A poorly maintained inflatable bridge void former may fail unexpectedly during concrete placement.
Storage conditions influence rubber life.
Store inflatable bridge void formers in a:
Dry
Clean
Shaded
Ventilated area
Avoid long-term exposure to:
Direct sunlight
High temperatures
Oil
Fuel
Solvents
Open flames
Sharp metal
The void former should be rolled or folded carefully according to its construction.
Avoid creating severe permanent creases.
Several common mistakes can reduce cavity quality or damage the inflatable bridge void former.
A small leak can become a major problem during concrete placement.
Always pressure-test before use.
Low pressure can cause deformation.
Use the specified working pressure.
Excessive pressure can shorten material life.
Do not assume that higher pressure always means better stability.
An unsecured inflatable bridge void former may float or move sideways.
Use adequate fixing points.
Sharp steel can puncture the rubber.
Inspect the reinforcement cage before installation.
Pouring heavily on one side can push the void former out of position.
Use balanced placement.
Vibrator impact can damage the rubber.
Keep vibration equipment away from direct contact.
The cavity may deform if concrete strength is insufficient.
Incomplete deflation increases friction and removal force.
Concrete buildup, sunlight, oil, and sharp objects can shorten reusable life.
Hollow slabs often use several inflatable bridge void formers in parallel.
Important considerations include:
Equal spacing
Consistent elevation
Correct diameter
Adequate concrete web thickness
Strong buoyancy restraint
All void formers should be aligned consistently.
Uneven positioning can create different concrete wall thicknesses.
Box girders may require larger inflatable void formers.
Key considerations include:
Larger buoyancy
Longer mold length
Higher concrete pressure
More complex shape control
More restraint points
Box girder applications often require custom inflatable bridge void formers.
For culvert applications, the void former creates the internal passage.
Important factors include:
Passage dimensions
Wall thickness
Mold length
Removal access
Concrete pressure
Large culvert formers require especially strong positioning systems.
Before concrete placement, verify:
Correct inflatable bridge void former size
Correct position
Correct length
Correct working pressure
No air leakage
No surface damage
Adequate concrete cover
Reinforcement clearance
Secure buoyancy restraint
Secure lateral restraint
Accessible valve
Clear removal route
During concrete placement:
Monitor working pressure.
Monitor position.
Monitor restraints.
Pour evenly.
Avoid direct impact.
Avoid vibrator contact.
After concrete placement:
Wait for sufficient concrete strength.
Deflate gradually.
Remove carefully.
Clean thoroughly.
Inspect before storage.
Although inflatable bridge void formers are relatively lightweight, safe operation is still important.
Recommended safety practices include:
Use controlled air pressure.
Never exceed the specified working pressure.
Keep personnel away from damaged pressurized areas.
Use suitable pressure gauges.
Inspect hoses and valves.
Avoid sharp tools near the inflated former.
Release pressure before repair or removal.
Pressure safety should always be included in the construction procedure.
Reuse life can be improved by:
Using correct pressure
Avoiding punctures
Controlling vibration
Cleaning promptly
Repairing small damage early
Protecting valves
Storing away from sunlight and chemicals
The actual reusable life depends strongly on handling quality.
Replacement may be necessary when the former develops:
Severe tearing
Repeated air leakage
Major seam separation
Extensive abrasion
Permanent deformation
Valve damage that cannot be repaired
Loss of shape stability
Continued use of a heavily damaged inflatable bridge void former can increase the risk of failure during concrete placement.
The deflated void former is inserted into the reinforcement cage, positioned, inflated to the required pressure, secured against movement, checked for concrete cover, and then surrounded with concrete.
Use tie-down systems, positioning bars, steel supports, or reinforcement-based restraints. Balanced concrete placement also helps reduce movement.
It may flatten, sag, deform, or fail to maintain the required cavity shape.
Yes. Properly maintained inflatable bridge void formers can be reused for multiple concrete pours.
It should be deflated only after the concrete has developed enough early strength to maintain the cavity geometry.
Release the air gradually, allow the former to collapse fully, and then pull it carefully through the planned extraction opening.
Movement may result from buoyancy, uneven concrete pressure, insufficient restraint, or excessive vibration.
Protect sharp reinforcement, inspect the cage before installation, avoid dragging the rubber, and prevent direct contact with sharp tools.
Store them in a dry, clean, shaded area away from heat, oils, solvents, flames, and sharp objects.
Correct installation and use are essential to achieving reliable performance from inflatable bridge void formers.
The process begins with inspection, leakage testing, reinforcement preparation, and accurate positioning. The inflatable bridge void former should then be inflated gradually to the correct working pressure and secured against buoyancy and lateral movement.
Before concrete placement, contractors should verify cavity location, concrete cover, reinforcement clearance, valve access, and restraint stability.
Concrete should be placed gradually and evenly around the inflatable bridge void former. Excessive impact, uneven loading, and direct vibrator contact should be avoided.
Working pressure should be monitored throughout the pour because loss of pressure can lead to deformation and incorrect cavity dimensions.
After the concrete develops sufficient early strength, the void former should be deflated gradually and removed carefully.
Prompt cleaning, inspection, leakage testing, repair, and proper storage can significantly improve reusable service life.
For hollow slabs, box girders, beams, culverts, and other precast concrete structures, inflatable bridge void formers can provide lightweight handling, easy demolding, compact storage, and repeated use.
However, these advantages depend on correct installation.
By controlling pressure, position, restraint, concrete placement, vibration, demolding, and maintenance, contractors and precast manufacturers can achieve consistent hollow cavity geometry while reducing the risk of floating, leakage, deformation, puncture, and premature void former failure.
Este sitio web utiliza cookies para garantizar que obtenga la mejor experiencia en nuestro sitio web.
 English
 Portugues
 Pусский
 Français
 Deutsch
 العربية
 Italiano
 Ελληνικά
 हिन्दी


Comentario
(0)